Stained glass art is a timeless art form that has been around for centuries. It involves cutting and arranging colored glass to create beautiful designs that can be used for windows, lamps, mirrors, and other decorative pieces. If you have always been intrigued by the beauty of stained glass and want to get started with this art form, here is a guide to help you get started.
Learning The Basics
The first step in embarking on your stained glass art journey is to grasp the fundamentals, including familiarizing yourself with the essential tools, materials, and techniques for crafting stained glass pieces. Key tools you will need are a glass cutter, pliers, soldering iron, and grinder, along with materials such as glass, copper foil, and solder. Numerous online resources are available to help you master the basics of stained glass art, including tutorials, videos, and books. Be sure to explore the SCO ART GLASS YouTube channel, where our mission is to inspire you to discover, learn, and create your own stained glass artworks through engaging video content. Our channel features tutorials on foundational skills, project and studio ideas, and showcases our commission work, with live streams set to launch soon.
Choosing Your Design
Choosing the right design is crucial in your stained glass journey, whether you decide on a unique creation or find inspiration from patterns available online or in books. Consider the dimensions and complexity of the piece you wish to create, and select colors that complement each other and will shine beautifully when illuminated from behind. As you browse various websites offering purchasable patterns, it’s important to check the usage rights if you plan to sell the final products, as some designs may be limited to personal use only and prohibited for commercial resale. We invite you to frequently visit our site for a diverse selection of licensed patterns as we improve the formatting and clarity of our custom designs, many of which are hand-drawn. We are excited to announce that we will soon provide access to a collection of free patterns sourced from newsletters and various resources, available for your personal use.
No products found.
No products found.
Gather Your Materials
Once you’ve selected your design, it’s time to gather your materials. Stained glass supplies can be found at local craft stores or easily ordered online from various retailers. When choosing glass, opt for a diverse selection of colors and textures to add visual interest and depth to your creation. Consider mixing transparent, translucent, and opaque glass to create dynamic effects with light. Additionally, look for unique patterns and finishes, such as rippled or frosted glass, to bring an extra dimension to your work.
It’s also important to pay attention to the size and thickness of the glass you select. For larger projects, thicker glass may provide greater durability, while thinner glass can be more manageable for intricate designs. Ensuring the right balance between thickness, texture, and color will contribute to the overall success of your piece, making it not only visually appealing but structurally sound. Having the right materials on hand will set you up for a smooth, creative process from start to finish.
Consider starting with these glass packs to simplify your selection process.
No products found.
No products found.
Finding affordable and quality tools for stained glass work can be a challenge for beginners. To help you get started, I have curated a fantastic starter kit priced under $200. You may also choose a larger kit available in our store as a special order item, which may require a bit more time for delivery. Both options will help you embark on your stained glass journey with confidence, select the one that aligns best with your budget.
Beginner Budget Starter Kit
No products found.
Stained Glass Starter Kit – No Grinder

Budget-Friendly Stained Glass Starter Kit. Everything you need to begin with stained glass work: glass cutting, shaping, foiling & soldering. Kit features quality Choice Hand Tools and “Stained Glass Basics” instructional book and more.
$190.00
Student Stained Glass Starter Kit – No Grinder
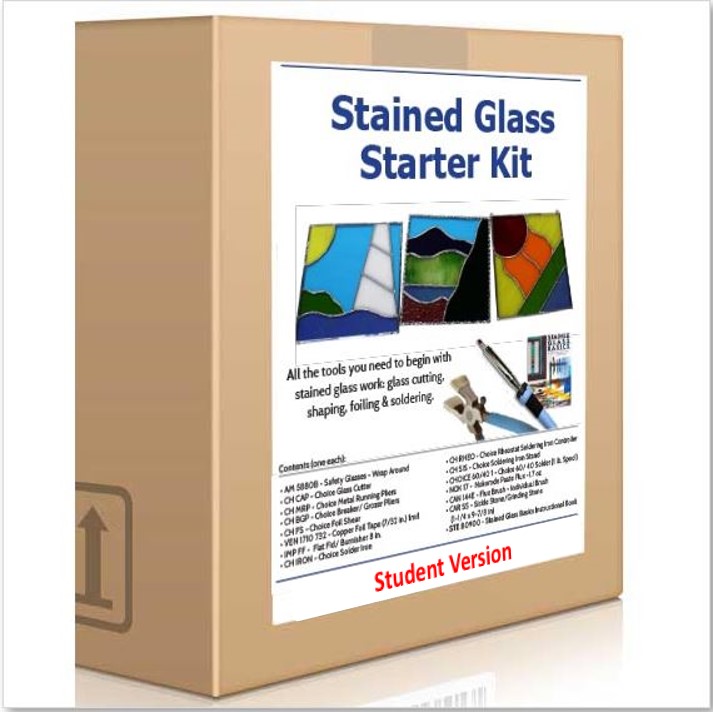
Budget-Friendly Stained Glass Starter Kit with Lead-Free Solder. Everything you need to begin with stained glass work: glass cutting, shaping, foiling & soldering. Kit features quality Choice Hand Tools and “Stained Glass Basics” instructional book and more.
$205.00
Stained Glass Starter Kit – With Gryphon Grinder
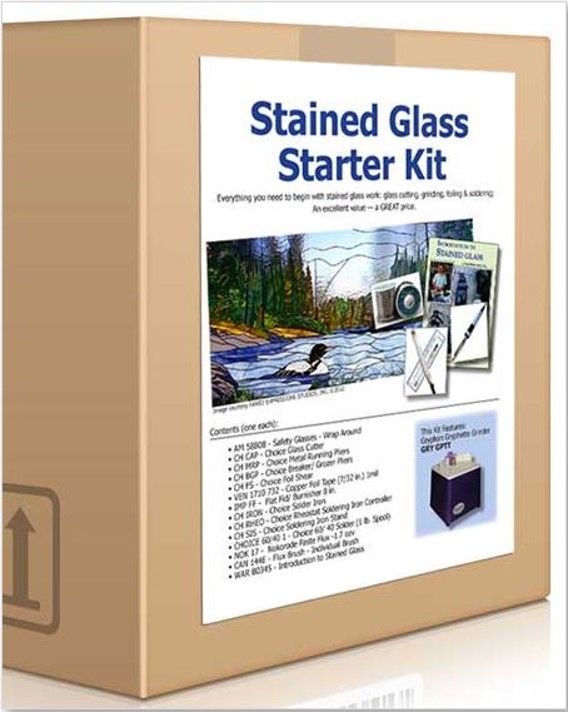
Start your stained glass journey with this stained glass starter kit that has everything you need to begin with stained glass work to include the Gryphon Gryphette Grinder.
$299.00
Student Stained Glass Starter Kit – With Gryphon Grinder

This stained glass starter kit is great for organizations and clubs with no worries about using lead solder. It has everything you need to begin with stained glass work including the Gryphon Gryphette Grinder that could be shared. Then purchase the Student Kit with no grinder for the number of students in the activity.
$305.00
Cut and Grind the Glass
With your materials prepared, it’s time to embark on one of the most exciting steps in stained glass art: cutting and shaping your glass. Start by laying your glass on a flat surface and using your glass cutter to score along the lines of your design. Apply steady, even pressure as you guide the cutter, creating a clean, precise score that will serve as the foundation for shaping your piece. The key to success here is confidence—once you commit to a line, follow through to ensure a continuous and smooth cut.
After scoring, use breaking pliers to snap the glass along the scored line. Align the pliers with the score mark and apply gentle pressure until the glass breaks cleanly along the cut. This part of the process can be both nerve-wracking and thrilling, as you witness your design start to take physical shape. Be patient, and don’t be discouraged if a few pieces don’t break perfectly—practice will improve your technique.
Once you’ve successfully cut your pieces, it’s time to refine them for a perfect fit. This is where the grinder or carborundum stone comes in. Carefully grind the edges of each piece to smooth any rough areas and ensure they fit together precisely. The grinding process not only improves the safety of handling the glass but also allows for better alignment when assembling your final project. Take your time with this step; the cleaner and smoother your edges, the more polished your finished artwork will look. Proper grinding will ensure that each glass piece fits seamlessly, elevating your stained glass creation from a rough concept to a breathtaking, finished masterpiece.

Foil and Solder the Glass
Once your glass pieces are meticulously cut and ground, the next step involves skillfully connecting and soldering them together using one of two effective methods commonly employed in stained glass construction.
Method 1: Tiffany (Copper Foil) Method -This innovative technique, pioneered by the esteemed American artist Louis Comfort Tiffany during the transformative period of the late 19th century, brought about a remarkable shift in the realm of stained glass artistry. Departing from the conventional methods of utilizing lead came, Tiffany’s introduction of the copper foil technique marked a significant advancement, as it involved meticulously wrapping thin strips of copper foil around individual pieces of glass. This groundbreaking approach enabled artisans to achieve not only more intricate and delicate designs but also allowed for unprecedented creativity in their work. The flexibility of this method facilitated the creation of elaborate patterns and a dazzling array of vibrant colors in stained glass lamps and windows, which in turn played a pivotal role in the rise of the Art Nouveau movement. This evolution not only elevated stained glass to a prominent decorative art form but also showcased the limitless possibilities of artistic expression in a medium that was once constrained by traditional techniques.
Method 2: Leading Method – This traditional method, with its roots in medieval Europe, has served as a vital foundation for stained glass artistry for centuries. It employs strips of lead, commonly referred to as “came,” to skillfully join individual glass pieces, thus enabling the creation of complex and long-lasting designs. This technique became especially renowned within Gothic cathedrals, where grand stained glass windows transformed sacred spaces, weaving narratives through the interplay of color and light. The lead came method is not only rich in history but also highly accessible, inviting both novice creators and seasoned artists to partake in its beauty, as it seamlessly merges simple assembly techniques with the freedom of artistic expression, cementing its status as an essential and gratifying skill in the realm of stained glass craftsmanship.
Whichever method you choose, remember that both processes demand patience and practice, so don’t feel disheartened if your initial results aren’t perfect. Take the time to research and select the method that resonates with you the most. I offer tutorials on the copper foil technique that you should definitely explore. As I embark on my own journey with the lead came method, I will be sharing tutorials to document and share what I’ve learned along the way.


Clean and Finish Your Piece
Once you have soldered all your glass pieces together, it’s time to clean and finish your piece. Use a damp cloth to clean any excess flux or solder from your piece. When using the lead came method, you’ll need to apply glazing compound (cement) to seal the gaps between the glass and the lead came. This process, often referred to as “glazing” the stained glass window, creates a weatherproof barrier while securing and strengthening the entire panel. This step is essential for durability and long-term protection of the artwork.
Next, apply patina to darken the solder, giving your piece a polished, finished look. Whether you choose a patina finish or keep the natural silver, be sure to apply finishing wax and buff it to a shine. This final step not only enhances the appearance but also protects your artwork for long-lasting beauty.
Below the two Cat Panel pieces are two products I recommend that I have used with great results.


No products found.
No products found.
Summary
Now that you’ve explored each step of the stained glass process, you’re ready to dive into creating your own stunning pieces. From selecting the right materials and mastering the basics of glass cutting to fitting the pieces together with lead came or copper foil, you’ve learned the essential skills to bring your designs to life. Applying solder to join your glass, using patina for a finished look, and sealing your work with glazing compound ensures your creation is both secure and visually striking.
Getting started may feel a bit overwhelming at first, but remember that stained glass is a art form where patience and practice are key. As you continue to experiment with different techniques and designs, you’ll gain confidence and discover your own unique style. Each project is an opportunity to learn something new—whether it’s refining your cutting skills, improving your soldering technique, or mastering the application of patina and finishing wax.
The joy of stained glass lies not only in the end result but in the creative journey itself. As you work through each step, you’ll find satisfaction in the hands-on process of transforming raw materials into something beautiful. Don’t be afraid to make mistakes along the way—they’re part of the learning process and will ultimately help you grow as an artist.
Now that you have a solid understanding of the stained glass process, it’s time to gather your tools, materials, and imagination. Start small, with simple designs, and gradually challenge yourself with more complex projects. With dedication, your skills will improve, and you’ll soon be creating intricate and eye-catching works of art that reflect your personal vision.
Stained glass offers endless possibilities for creativity, whether you’re making a decorative window, a unique lamp, or a piece of wall art. The vibrant colors, interplay of light, and tactile nature of the craft make every project special. So, take the first step, embrace the process, and enjoy the rewarding experience of bringing your artistic ideas to life in the world of stained glass.
